VolumePreview generates a preview of environment effects in the viewport including volumetrics, lens effects and shadows. It requires a camera view to generate a preview. After generating the preview data, the viewport displays the volumetric effects, sha
VolumePreview generates a preview of environment effects in the viewport including volumetrics, lens effects and shadows.
It requires a camera view to generate a preview.
After generating the preview data, the viewport displays the volumetric effects, shadows and lens flares in realtime.
Features
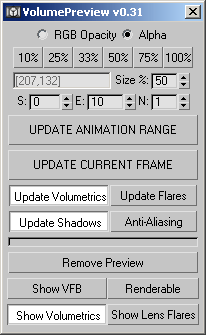
The preview can be generated in any user-defined resolution. You can enter a percentage of the current viewport size, or press one of the preset buttons to quickly set the value. The resulting size will be displayed by the window to the left of the value.
When the "Show VFB" checkbox is enabled, the sample rendering will be displayed. It is off by default. The progress will be displayed by the progress bar at the bottom of the dialog. Red progress bar shows the update of environemnt effects, blue bar shows the update of lens effects.
The preview requires a camera in the active viewport. If the active viewport is not a camera viewport, you will be prompted.
You can create a single frame preview (for example when the camera is static) by pressing the "UPDATE CURRENT FRAME" button. You can repeat this for any frame you want - for example, if you move the time slider and press the button again, the current frame will be rerendered without affecting any existing frames.
The last known image will be used on any consecutive frames without a preview frame. For example, if you update only frame 0, it will be shown on all following frames until the end of the animation. If you move the time slider to frame 10 and update the frame, you will see frame 0 from 0 to 9 and 10 from 10 to the end of the animation segment.
There are two preview layers - one for shadows and environment effects and one for lens effects. Both layers can be updated independently at different resolutions and toggled on and off separately. Use the checkbuttons to specify which layer(s) you want to update. Note that "Update Volumetrics" must be checked for "Update Shadows" to have an effect.
If you want to render a range of frames, you can use the "UPDATE ANIMATION RANGE" button. It will use the values specified by the "S" and "E" values ("Start" and "End") which default to the current animation segment.
The "N" value ("Nth") lets you render every n-th frame.
You can update only a sub-range of the current segment, or a range larget than the current segment.
You can generate previews in different resolutions - for example, render a preview of the whole animation at a very low resolution, then update single frames individually to check detail.
The time used to generate the preview will be printed to the MAXScript Listener and will be shown in the prompt line of the status panel at the bottom of the 3ds max UI.
You can save the scene without disabling the preview - next time you open the scene, the preview should be active again.
There can be any number of previews stored on the hard disk. The scene name will be used as part of the files written to disk, so renaming the scene or saving incrementally will leave a set of preview files behind and create a new set next time you use the UPDATE buttons.
You can hide either of the preview layers by unchecking the "Environment" and "Lens Flares" buttons.
The "RGB Opacity" and "Alpha" options let you switch between using the alpha channel and RGB mode for Environment effects. The state of the radio buttons is sticky between sessions. When in RGB mode, shadows will not be displayed and volumetric effects will be more transparent. Note that the Lens Flares layer will always use the RGB mode.
You can remove all traces of the script by pressing the "Remove Preview" button. All VolumePreview files in the \Previews\VolumePreview directory, the screen overlay planes and materials will be removed.
You can enable "Anti-Aliasing" for finer results, but rendering time will be longer. (AntiAliasing was always on in 0.2.4). When off, quality will be slightly worse, but update times can be up to twice as short!
Installation
Download the ZIP file, save under \Scripts
Unzip to \Scripts
Start 3ds max 5 or 6, go to MAXScript>Run Script... and select the file
Go to Customize>Customize User Interface>Toolbars, locate "VolumePreview" under "Bobo_s Tools" category and drag to a Toolbar.
Version Requirement: 3ds Max 3ds Max 5 and higher
Author: Borislav Bobo Petrov
Version: 0.34