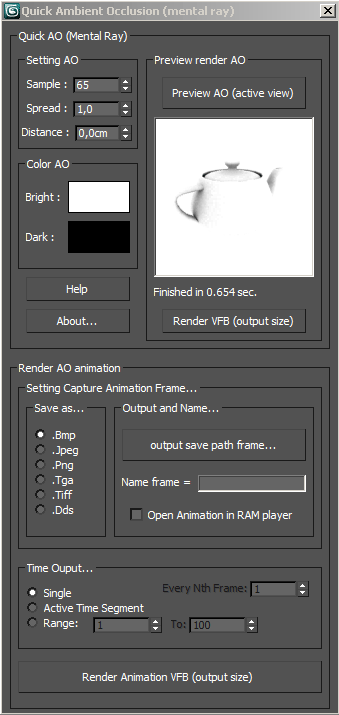
Quick Ambient Occlusion is a fun script creates a fast Ambient Occlusion, it should be used with Mental Ray, fast and simple method to simulate the effects of global illumination.
Quick Ambient Occlusion is a fun script creates a fast Ambient Occlusion. It should be used with Mental Ray. The operation is non-destructive, so you do not loose the original settings.
Occlusion is a fast and simple method to simulate the effects of global illumination.
Occlusion is the extent to which the area above a point is covered by other geometry.
This is achieved by tracing a number of probe rays inside the hemispherical area above the point and testing to what extent this region is blocked.

Ambient Occlusion
-- Samples
Is the number of probe rays that will be sent. More rays yield a smoother image.
Occlusion mapping will never be as smooth as well-tuned final gathering or photons, but is computationally cheap.
-- Bright
Is the color used when no occluding objects are found.
-- Dark
Is the color used when total occlusion occurs. In most practical cases it is set to black.
For partial occlusion, a gradual mix between the bright and darkcolors is returned.
-- Spread
Defines how large an area of the hemisphere above the point is sampled.
The value defines a cone around the sampling direction which is narrower for small values and wider for large values. It ranges from 0.0, for a cone that is a single direction, to 1.0 for a cone that covers the entire hemisphere.
-- Distance
is the range within which geometry is probed. If it is zero, the entire scene is sampled.
If it is a nonzero value, only objects within this distance will be considered (which makes sampling much faster) where objects outside this range do not occlude at all and objects that are closer occlude more strongly as the distance approaches zero.
----------------------------------------------
Render AO animation
----------------------------------------------
Before you start SAVE the scene.
-- Save as...
They are the extension of the file to be saved.
It is always recommended to never use a complete movie (such as. Avi) but single frame, so as to avoid problems during the rendering stage (crash ecc.) and do not miss the job created up to that point.
-- Output and Name...
"Output save path frame..." = Choose where to save the frame.
IMPORTANT: if we do not decide the destination for the file, it will use the folder "image" of our project to save the image.
"Name Frame" = Here we decide a name for the saved file.
IMPORTANT: No need to create a name with sequential numbers, because they are already associated with the same name.
So, just write for example "Test" to find images with "test0001" and so on. sequential numbers will always be applied, remember this well.
WARNING: If we save file with same name of file previously saved, it will be overwritten without confirmation!! Be careful!!!
"Open Animation in RAM player" = If you check this box, finished rendering will open the RAM player with the animation or image saved. Will create a file .ifl in the directory previously created (or folder "image").
IMPORTANT and WARNING: Give a name to the image created always different!! If we save file .ilf with same name of file previously saved, it will be overwritten without confirmation!! Be careful!!!
-- Time Output
This group works the same present in "Render Setup"
-- Button "Render Animation VFB (output size)
Push this button for start the rendering in VFB. The render use the view or the selected camera.
WARNING!!!!: Always end the rendering!! if we press the "Esc" key to stop the render, the material to create the AO, as well as other factors (background map, map override, background color) are left in memory! If this happens we have to reload the scene. Be careful!!!!
----------------------------------------
Installation
Before installing, delete any previous versions (very important)
1- Unzip
2- Copy the folder "Michele71_Script"
3- Paste then into your folder Scripts in Max (like "C:\\Autodesk\3dsMax2010\Scripts")
4- Start 3DSMAX and run script "Launch_QAO.ms" inside the folder "Michele71_Script"
5- Go to "Costumize" > "Customize user interface" > "Menus"
6- In "Category" find "Michele71_Tools" and choose "Quick_Ambient_Occlusion_1.5"
7- Create new menu in list "Menus" and Drag and Drop the new menu in the "Main Menu Bar".
8- Drag and drop "Quick Ambient Occlusion" in new menu.
