chroma.dlt is a new texture map for 3ds max that will allow you to create a rough (!) chromakey from any other map. The chromakey mask can be used inside the viewport and at render-time. It\'s main targeted use is for previewing blue-/greenscreen composite
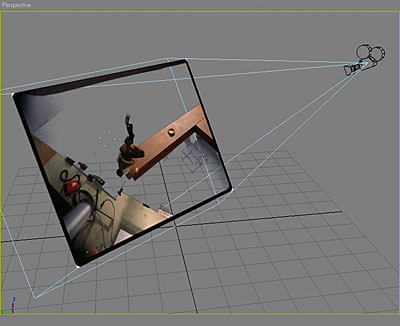
chroma.dlt is a new texture map for 3ds max that will allow you to create a rough (!) chromakey from any other map. The chromakey mask can be used inside the viewport and at render-time. It's main targeted use is for previewing blue-/greenscreen composites inside 3ds max. This can be useful for projects with set extensions, for example, since you directly see the image composition inside your viewport. The chromakey is calculated on the fly, so you can use any image/image sequence without having to pre-calculate a key with a compositing software.
Installation
Just copy chroma.dlt into any of your plugin directories and restart 3ds max. Mental Ray is not supported, so you need to switch to default scanline renderer. Once installed, you will find a new texture map in the material browser: ChromaKey.
Note: In order to see the chromakey results inside the viewport, you need to switch to "Best Transparency" in the Viewport > Configure dialog if you are using OpenGL. The actual settings might vary, depending on what graphics card and driver you use. chroma.dlt was successfully used on NVidia Geforce 4 and Geforce FX5700 cards.
Usage
You can place a ChromaKey map into any of your material slots; using it as an Opacity map is recommended.
Activate the "Show Map In Viewport" button of your base material in order to see the chromakey effect in the viewport.
Options
Map - Place any 2D map into this slot as input signal for the chromakey process; normally, this would be a bitmap or image sequence.
Color Distance - Select this option to calculate the key based on the RGB distance between each pixel value and the screen color.
Screen Color - This is the target color for the Color Distance algorithm; the closer in RGB space a pixel value is to this color, the more transparent it's key value will be; not used for the Color Difference algorithm.
Color Difference - This option activates the Color Difference algorithm that was the foundation for the Ultimatte system (this is a very simplified version of it); pure blue or green will be target color for the key.
Bluescreen / Greenscreen - Use this option to switch between blue and green as base key color.
Matte controls - This section of the UI allows you to fine-tune your key to some extent.
Clamp - Depending on the Remap option, these two values either control which key values will be cut off (Remap=off) or which key value range will be scaled to 0..255 (Remap=on).
Gamma - This is a simple gamma function that will be applied to the key values afterwards.
Alpha to RGB - If on, this will copy the key values from the alpha channel into the RGB channels; if off, your key will only be in the alpha channel; if you use chroma.dlt as opacity map, you want this on.
Remap (level) - This option controls what the clamp values do: they either cut off any key values outside their interval and do not modify values inbetween (Remap=off) or they rescale all values in the interval back to the maximum range, which is similar to what the Photoshop level function does.
Download chroma.dlt v0.1 for 3ds max R6; optionally, download ImagePlane 1.3 for positioning your bluescreen material correctly in front of your camera.