Sal Facial Auto Rig provide fast and easy way to create facial rig in 3Ds Max, all you have to do is to create your morphs and connect them to your setting file and your rig will be ready in seconds.
Sal Facial Auto Rig provide fast and easy way to create facial rig in 3Ds Max, all you have to do is to create your morphs and connect them to your setting file and your rig will be ready in seconds.
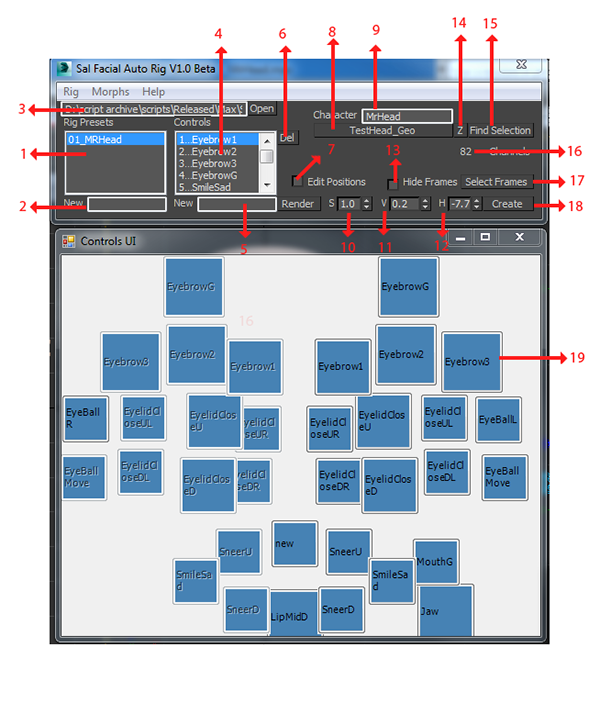
Sal Facial Auto Rig main gui
1- Preset file list, those are setting files that hold the rig data, they exists in the script's preset direcotry, by selecting each file it will load its settings to all scripts dialoges, and when changing any data it will automaticly stored in the selected file
2- New Preset file, just type the file name to create a new preset
3- the script's preset directory, here were the preset files exist, you can copy folder directory from the expolorer and paste it here to change it
4- controls list, those are list of control's settings they are inside the rig preset file, and they change on changing it
5- new control, to create a new control type it's name here, you can't have two controls of the same name
6- delete control, select the control you want to delete and press it, this action can't be undo
7-edit position, when this option is on you can change the controls position by dragging their buttons around, when it's off you can change their settings, when you click a control settings UI will appear
8-Character's Head, here were you pick the character's head it must be editable poly, and it would be your main Morphed Object,
9-Character's Name, if you changed the character's name, this going to change the morph objects name in the settings, and if the scene if they do exists, it's also going to change the masters and the slaves Dialoge, Character Name MUST NOT BE EMPTY or it might ruin your preset file data
10-this will change the button size in Controls UI and as a result it will change the size of the controls on rig create
11- 12- this will change the position of all controls horizontally and vertically
13- hide frames, you would propaby won't like to see those frames while animating so you can hide them and show them from here, this will actually put them in the hidden layer of the character and taking them out of it
14- while creating morphs, you might want to select the head geo and zoom to it, this button do this task for you
15- find selection, you might want to find the setting of control or morph in your scene, select the morph or the control and click find select, this will open the control settings if it does exists
16- channel count, this number will keep track of your channels,3Ds Max can't have more than 100 channel on the classic morpher modifier, unchecking prograssive in the controls setting will compress every 2 channels into one so you can have a limit of 200 channel instaid of 100
17- select frames, you might want to freeze or unfreeze hide or show frames, this will help you select all of them instantly so you can preform your operation
18-Create your rig, this will create your rig, on rig creating, it will do these steps
-create controls , frames, and rig main spline square if they don't exists and position them based on the script's gui
-mirror morph targets if they need to be mirrored and if they don't exists so if you changed any morph target you might want to delete it's mirror so the script will recreate it
-create morpher modifier and connect the morph targets to it, and connect morpher channels to controls
-connect slaves to master based on their values and settings in the slavery dialoge
19-Control button, if Edit Position is checked on you can move your buttons around and organize their look, if it's turned off you can click on each one and edit their settings
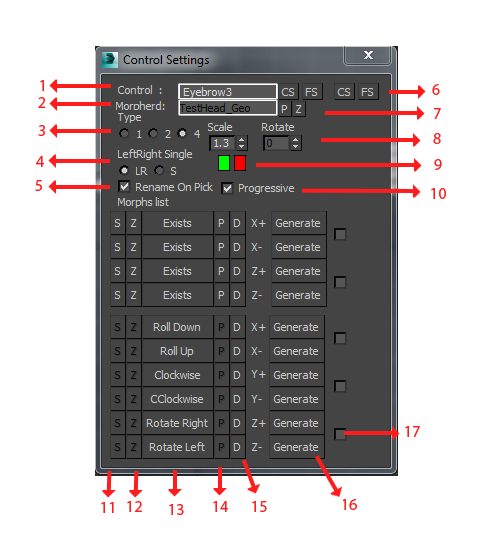
1-Control Name, you can edit the control name from here
2-Morphed object, each control can have a different morphed objects, but default the morphed object is the character head,but it could be the eyes , tongue , teeth or what ever you have in your scene,
3-type, there are 3 types of controls 1- a single target, 2- two targets, 3- four targets, the last one has square frame
4- LeftRight Single, does your control has left and right like the eyebrows, or it's single like the nose?
5- Rename On Pick, this will automaticly rename morph targets on pick, this will organize your morphs save you the trouble of manually rename everything, if you are using a different , but it should be disabled sometimes, when you have more than one morphed object have the same morph target, like left and right eyeballs
6-CS FS, is control select, and frame select, if your controls are already created you can select them from here
7- P,Z , P will pick an ulternative morphed object, I use them mostly on Eyeballs, Z will select and zoom to this morphed
8-Scale, Rotate, this transformation is saved in your settings and saves you the trouble of scaling rotating your controls everytime you create your rig
9-Colors, you can defined control colors so you don't have to change their color after creation
10-Prograssive, All channels in morpher modifier are prograssive by default\n unfortunately we have only 100 channels, that's sometimes not enough, to solve this I used the prograssive appilty to fit 2 morph objects in one channel, so the morpher modifier can double the poses that can have,
normally the channel value in the morpher will start at 0 and end at 100, when disabling the prograssive check box, the morpher channel will start at 66.6 and will have the range 33.3-99.9 to fit two poly objects in one channel"
11-S, select morph target if they do exists
12-Z, select and zoom to morph target if they do exists
13- pick buttons, here were you pick the morph targets
14-Prograssive, open the porgrassive dialog to add prograssive targets,I use it mostly on eyelid close,
15-D, delete your input and restore the default state
16-Generate, you can generate and pick in the same step using this dialoge
17-Offset and Multiply will add extra controls so you can play around with my other script Sal Facial Pose
Version Requirement: 3ds Max 2014
Author: Salwan Badra
Homepage: https://www.behance.net/gallery/18174793/Maxscript-Sal-Facial-Auto-Rig
Video URL: https://vimeo.com/100094341